How to Use Kahoot in the Classroom
If you haven’t heard of Kahoot yet, time to check it out! This site is AMAZING! There are so many possibilities for use and your students will LOVE IT! It is great for gathering information from your students in a really engaging way. We’ve used this in several PD opportunities I’ve attended, and the adults are just as engaged! Today I want to share more about how to use Kahoot in the classroom, including a step-by-step guide for setting things up.
What is Kahoot?
Kahoot is a site that lets teachers gather formative assessment data in a way that won’t overwhelm learners or feel like just another test.
As a teacher, it allows you to quickly and easily figure out what your students have a solid grasp on and what you’ll need to spend more time teaching in a game-like environment.
Sounds great, right?
Getting Started with Kahoot!
The great news is getting your account set up is quick and easy. Even if you’re not so tech saavy, you can easily get your students using Kahoot in minutes. Here’s what you’ll do:
1. Sign up for a free account.
Start by heading over to getkahoot.com, and click on the “get my free account” button. As you can see from the picture, it is big and lavender. You truly cannot miss it!
Once you’ve clicked the site will ask you a few questions. Educator accounts are free, which makes it even more awesome! Once you’ve entered a login and password of your choice, you’ll be taken to your dashboard, and you are ready for Step 2.
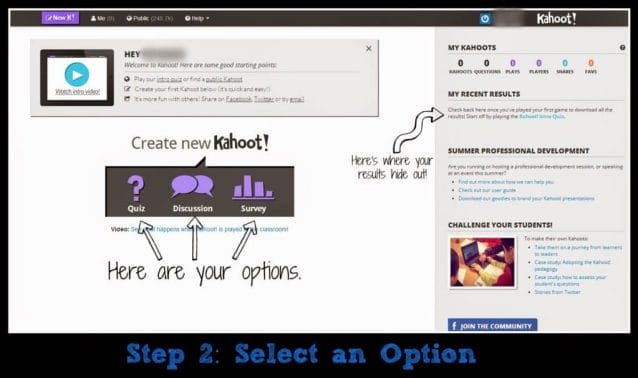
2. Select the option that works best for you.
You’ve got three choices on Kahoot! Keep reading to get a little more information about each choice so you can pick the one that is best for you.
Option 1: Quiz
This choice is perfect for collecting formative (or summative, if you are headed out of the box) data on your class. Similar to a multiple choice quiz you’d give on paper, but it is WAY more fun for students. Enter your questions and answer choices, and you’ll be all set to go. Something super cool is you can add images and video to your questions if the topic fits! The data is collected as you go so you can see who gets it and who needs some support.
Choice 2: Discussion
Truthfully, this option is not at the top of my list. Perhaps it just isn’t a good fit for my third graders, or I just haven’t found the ideal way to use it. Like the title suggests, the goal is to start a discussion or debate. Students only answer one question for this one.
Choice 3: Survey
This option is similar to a quiz, but there are no scores involved. Great for times when you want to collect class data, but you don’t need scores. I love it for my unit on graphing and data analysis because we can collect data from our class or grade-level and use it throughout the entire unit.So let me take you through the steps of making a quiz, since it is the most commonly used choice for my classroom (plus making a survey is nearly identical).
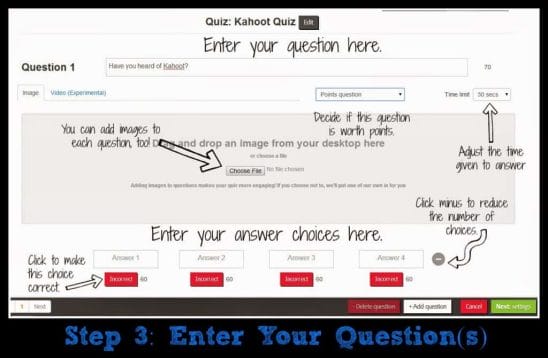
3. Add a Title & Input Your Question
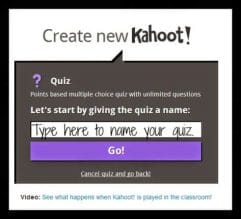
First, place you’ll be taken to once you click quiz is the screen to enter a title.
As you can imagine, you want your title to be something that you can easily locate next time you want to use this same Kahoot! (Common sense, right?).
Just type in a title and click the lavender box to start entering your questions. It is truly as simple as it sounds. You will be taken to a screen like the one above.
Enter your question, select the amount of time you want students to have, and type in your answer choices. To indicate which is correct, click the red “incorrect” button to change it to the green “correct” button. Easy peasy, right?
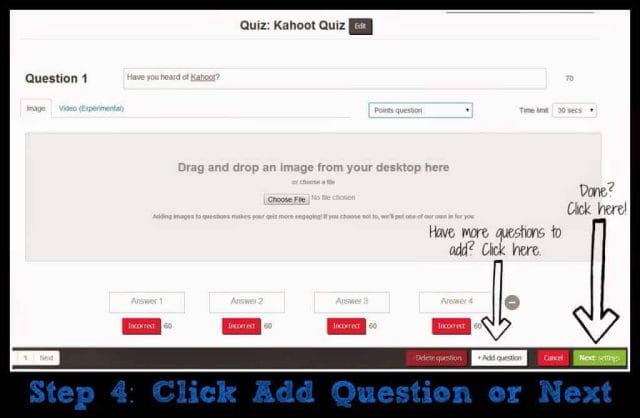
4. Repeat with the rest of your questions or click next to move on.
You are just a hop, skip, and a click from done now! If you have more questions, enter them using the same process as above. If you are done entering questions, click the green “next” button. You’ll be given the option to add a cover image, and that’s it! You’re done!!
If you have more questions, enter them using the same process as above.
If you are done entering questions, click the green “next” button. You’ll be given the option to add a cover image, and that’s it! You’re done!!
5. Launch Your Kahoot!
You can (and should) take some time to preview your quiz before giving it to the kids, but assuming you’ve done that, I am going to move you through the steps of collecting your data.
There will be two sides to these directions- teacher and student.
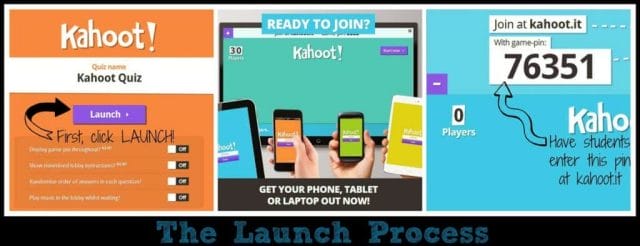
When you are ready, click LAUNCH!
You’ll see all three screens below as you go through the process. Turn on your projector and you are ready to go. (Yes, you must be able to use a projector for this site…unfortunately, the students must get the question from your screen. It does not show up on theirs. One major bummer of the site.)
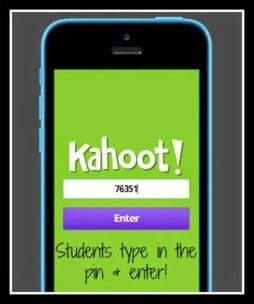
When students go to Kahoot.it, they will see the screen below. This is where they enter the pin number that is on your screen will be entered. Students type in the number and click enter. They will then be prompted to enter a nickname and join.
This is where they enter the pin number that is on your screen will be entered. Students type in the number and click enter. They will then be prompted to enter a nickname and join.
I number my kiddos, so typically I just have them enter their number or their first name. Depends on the assignment. The bonus for me is that numbers put them in automatic order for grading…unlike first names.
The good news is the site has added a feature that allows you to kick someone off if you have a class clown who decides it would be super funny to add an inappropriate nickname. They can always rejoin with something more appropriate using the pin.
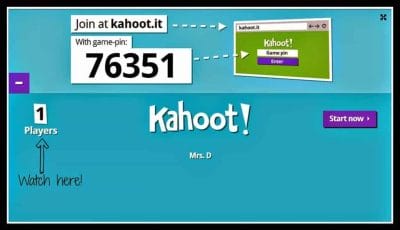
Watch your number of players grow until the whole class has joined. That is how you’ll know you are ready to start.
Click the big, purple “start now” button, and you’re good to go.
Students will be given the first question with a short wait time before the answer choices appear (great for your slower readers or to give you a chance to read the question aloud…LOVE this feature!).
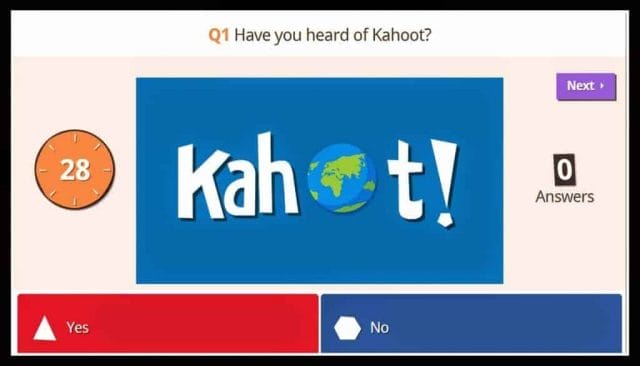
Here’s what your screen will look like for any given question. Notice the timer on the left. This counts down for the number of seconds you gave students.
Once times up or all students have answered, you’ll be ready to see the results and move on to the next question.
The bottom of the screen shows the answer choices (each with a different color and symbol). The student device only shows these colors and symbols.
Again, students do NOT see the question on their device so be sure they can easily see the board. Students get more points for answering quickly AND accurately. There are no points awarded for just being fast.
After each question, students will get immediate feedback on whether their answer is correct on their device.
The screen will also show a bar graph to see how students answered, and you’ll be shown a leaderboard of your top five scoring students. This is updated for every question and is the major difference between the survey version mentioned above and a quiz. (But you do still get a graph for the survey…which is nice.)
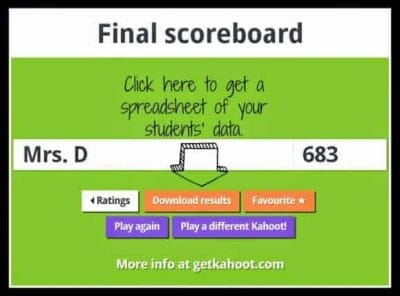
Once your quiz is done, you will be able to download and explore your student data more specifically.
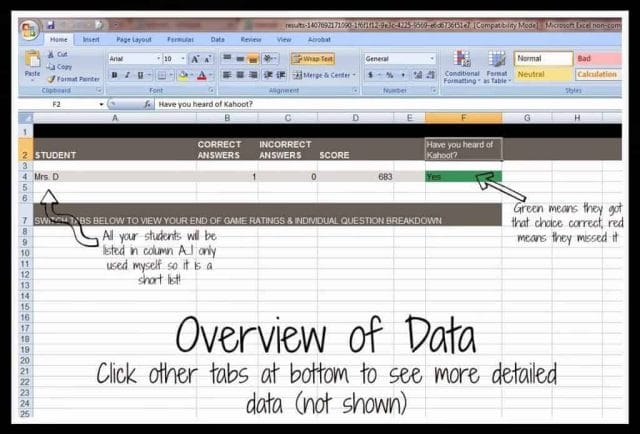
Here are a few screenshots of what that will look like in case you are a visual person.
Click to download results, and an easy-to-read, color-coded spreadsheet will pop up. It couldn’t be easier!
I use this data to help me plan where to focus my time during a unit because it helps me identify who has a concept or knows a term, and who might need a targeted intervention…or where the whole class needs some attention.
So there you have it, a step-by-step tutorial about Kahoot!
I love this site, and I plan to use it a ton this year on my computer day to collect data on how my students are progressing through a unit.


